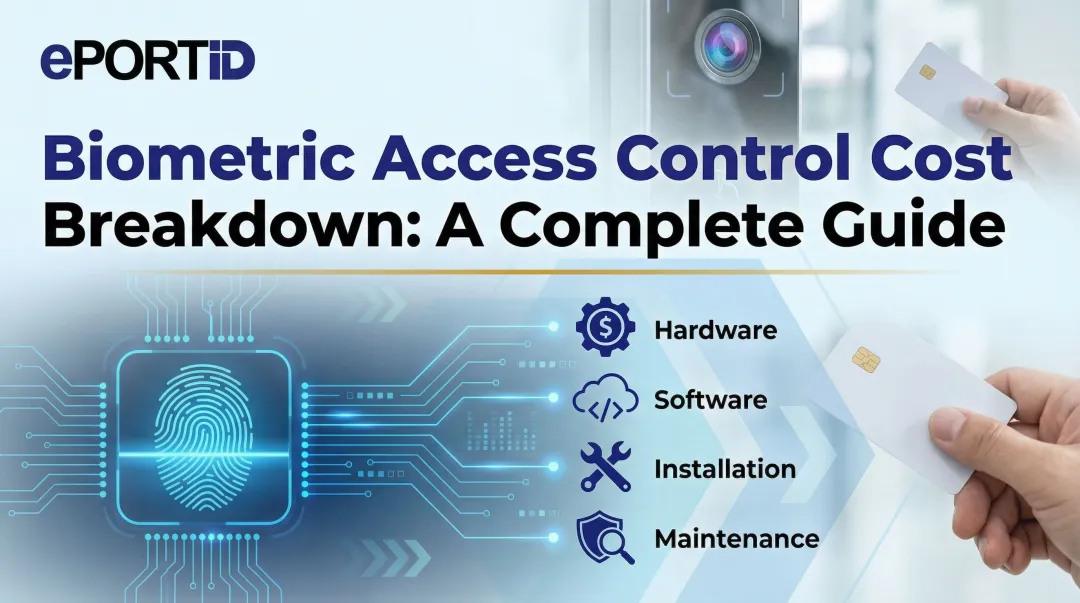
Introduction
Installing a biometric access control system is more demanding than a standard keycard or keypad setup. Precise hardware placement, network integration, biometric calibration, and data privacy compliance must all be addressed before a single user is enrolled.
Who should perform the installation? Trained in-house security or IT personnel with low-voltage wiring experience can handle straightforward single-door deployments in controlled environments. Ports, data centers, hospitals, and military installations are a different story — those environments demand certified specialists. The stakes are higher: installation errors in critical facilities can mean unauthorized access to sensitive areas, compromised audit trails, and regulatory violations.
Get the installation wrong, and the consequences follow a predictable pattern:
- Poor recognition accuracy that frustrates users and slows access
- Unauthorized access vulnerabilities that defeat the system's purpose
- Failed integrations with existing security infrastructure
- Voided manufacturer warranties
- Re-work costs that routinely exceed the original installation budget
In regulated environments, these problems compound fast. A recognition failure that delays emergency responders — or a compliance gap surfaced during an audit — can create liability exposure that dwarfs the hardware cost.
This guide covers every phase of installation — from pre-installation planning through post-deployment validation — with the technical depth needed to get it right the first time.
Key Takeaways
- Installation requires qualified personnel with low-voltage wiring, network configuration, and biometric hardware experience — not general contractors
- Confirm site readiness before starting: power infrastructure, network capacity, environmental conditions, and compliance with applicable biometric data privacy laws
- Follow the defined sequence: site survey and hardware selection → mounting and wiring → software configuration → user enrollment → post-installation testing
- Skipping validation steps, especially testing under varied conditions and simulating access denial scenarios, causes most delayed system failures
- For critical infrastructure, engage a specialist with proven high-security deployment experience; improper installation creates serious security and legal risk
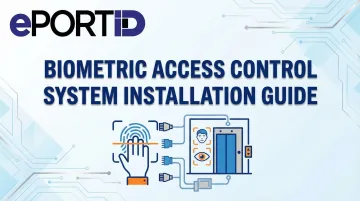
Installation Guide for a Biometric Access Control System
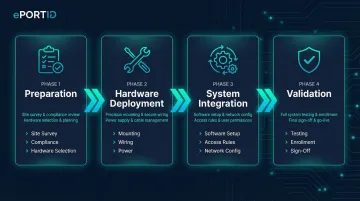
The overall installation process consists of four distinct phases: preparation (site survey, compliance check, hardware selection), hardware deployment (physical mounting, wiring, power), system integration (software setup, access rules, network configuration), and validation (testing, enrollment, sign-off). Collapsing these into a single continuous push is one of the most reliable ways to create failures that don't surface until the system is under full operational load.
Set realistic expectations on time and skill requirements. A single-door system in a controlled indoor environment may take a trained technician a few hours to mount hardware and establish basic communication. However, a multi-door enterprise deployment across a large facility requires days of coordinated effort — typically 2-5 days for a 10-door installation, depending on existing infrastructure and integration complexity. Attempting to compress this timeline consistently produces problems that surface weeks or months later when the system enters full operational use.
Prerequisites and Safety Considerations
Before any physical work begins, confirm these non-negotiable prerequisites:
Structural and Power Requirements:
- Wall surface type and mounting load capacity - Biometric readers and control panels must mount to surfaces capable of supporting the hardware weight plus resistance to tampering. Drywall alone is insufficient; locate wall studs or install backing plates
- Power supply type availability - Determine whether 12VDC dedicated power or Power over Ethernet (PoE) will be used. PoE options include 802.3af (15.4W), 802.3at (30W), and 802.3bt (60-90W). Check specific reader power requirements; some biometric readers draw 2A peak current
- Network infrastructure and bandwidth - Networked readers require IP addressing, VLAN configuration, and sufficient bandwidth for biometric template transmission. A managed switch supporting remote administration is essential for enterprise deployments
Environmental Conditions by Biometric Modality:
Different biometric technologies have different environmental sensitivities. Facial recognition readers perform poorly in direct sunlight or strong backlighting and require controlled indoor lighting. Fingerprint readers degrade with dust, moisture, or extreme temperatures.
According to NIST's Framework for Implementing Passive Live Facial Recognition, highly directional lighting such as strong sunlight should be avoided, and cameras should operate with Wide Dynamic Range to generate sufficient quality images.
Contactless palm vein scanning — which derives identity from subsurface vascular patterns using infrared light — largely sidesteps these environmental concerns. Because the technology reads internal vein structure rather than surface characteristics, dirty hands or moderate direct sunlight have minimal impact.
This makes palm vein readers well suited for industrial and outdoor-adjacent environments. Operating temperature ranges for industrial-grade palm vein systems typically span -10°C to 55°C (14°F to 131°F).
Data Privacy Compliance — Non-Negotiable Legal Requirements:
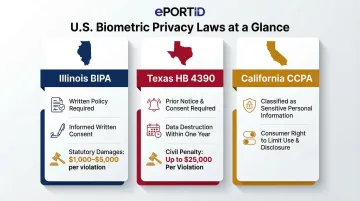
Installation of a biometric system triggers data privacy obligations that must be addressed before enrollment begins. In the U.S., there is no single federal biometric privacy law, but several states impose specific consent, storage, and deletion requirements:
- Illinois BIPA (740 ILCS 14) requires written policies on retention schedules, informed written consent before collection, and grants a private right of action with $1,000 statutory damages for negligent violations and $5,000 for intentional violations
- Texas HB 4390 prohibits capturing biometric identifiers without prior notice and consent, requires destruction within one year of purpose expiration, and imposes civil penalties up to $25,000 per violation
- California CCPA classifies biometric information processed to identify a consumer as "sensitive personal information," giving consumers the right to limit use and disclosure
Sector-specific regulations layer additional requirements. HIPAA classifies biometric identifiers as Protected Health Information (PHI), requiring facility access controls under 45 CFR 164.310. PCI DSS v4.0 Requirement 9 mandates physical access controls to restrict access to the Cardholder Data Environment. Legal review before enrollment is a regulatory requirement in most jurisdictions, not a procedural formality.
Conditions Where Installation Should Not Proceed:
- Active power at the door controller during wiring work
- Unsigned biometric consent agreements for the jurisdiction
- Incompatible access control panel protocols (confirm Wiegand or OSDP support before purchasing hardware)
- Unresolved structural mounting issues or missing wall anchors
Tools and Parts Required
Essential Tools for All Installations:
- Power drill with masonry and wood bits appropriate for wall anchor installation
- Cable fish tape for routing wires through wall cavities
- Wiegand cable (typically 6-conductor) or Cat6 Ethernet cable for networked readers
- Wire labels and connectors (WAGO lever terminals or crimped ferrules for secure terminations)
- Multimeter for voltage testing and cable continuity verification
- Manufacturer-supplied mounting template (critical for precise hole placement)
Additional Tools for Outdoor or Multi-Door Deployments:
- Weatherproof backboxes rated IP65 or higher for environmental protection
- Conduit fittings and EMT conduit for exposed cable runs
- Cable seal compounds for outdoor penetrations
- Terminal blocks for organizing multi-door wiring
Key Components Required On-Site Before Installation:
- Biometric reader unit with correct modality for environment
- Access control panel or door controller
- Electronic lock (electric strike) or electromagnetic lock (maglock)
- Power supply (12VDC regulated) or PoE injector/switch
- UPS or battery backup unit for fail-safe/fail-secure requirements
- Management software installation media or cloud service credentials
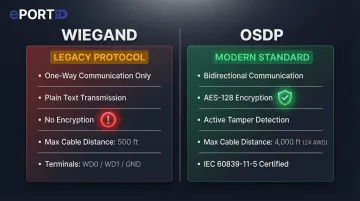
Critical Pre-Installation Verification: Confirm the reader's communication protocol matches the controller before unboxing. Wiegand is a legacy one-way protocol transmitting data in plain text with no encryption, making it vulnerable to interception. OSDP (Open Supervised Device Protocol) provides AES-128 encryption and bidirectional communication, supporting tamper detection and remote status monitoring. OSDP became an international standard (IEC 60839-11-5) in May 2020.
How to Install a Biometric Access Control System (Step-by-Step)
Biometric access control installation follows a specific sequence. Shortcuts — particularly skipping wiring verification or deferring software configuration until after physical mounting — consistently create problems that are difficult and expensive to diagnose after the fact. Follow this sequence without deviation.
Step 1 — Prepare the Installation Site
Use the manufacturer's mounting template to mark precise hole positions on the wall surface. Confirm the reader will sit at the correct height for the biometric modality:
- Fingerprint/palm readers: 4.5–5 feet (approximately 1.4 meters) from floor to reader center
- Facial recognition readers: Eye level, typically 5–5.5 feet depending on user population demographics
- Iris readers: Strict eye-level alignment required
ADA 2010 Standards specify that unobstructed forward reach shall be 48 inches maximum, which influences mounting height in public-facing installations. Verify that no backlighting or direct sunlight falls on the reader face during peak usage hours. For outdoor installations, confirm the enclosure ingress protection rating is appropriate: IP65 provides protection against water jets; IP67 protects against temporary immersion.
Step 2 — Mount the Reader Hardware
Drill anchor holes at marked positions, ensuring holes are plumb and properly sized for the anchor type. Install wall anchors or toggle bolts appropriate for the wall material and reader weight. Secure the junction box or mounting bracket, confirming it is level before final tightening.
Route cables cleanly through the wall cavity or conduit to the door controller location. Critical: Keep power cables and data cables physically separated by at least 6 inches to prevent electromagnetic interference. Up to 60% of power transients originate inside the facility, and coil kickback from electrified locks can send damaging surges back to control panels.
Step 3 — Connect Power and Data Wiring
Connect 12VDC power leads or PoE cable to the reader, observing correct polarity for DC installations. Wire data communication lines to the access control panel:
- Wiegand: Connect WD0 (Data 0) and WD1 (Data 1) plus ground. Maximum cable distance: 500 feet
- OSDP: Connect RS-485 twisted pair (typically terminals A and B). Maximum cable distance: 4,000 feet using 24 AWG 120Ω impedance cable
Connect the panel output terminals to the electric lock or maglock according to the lock manufacturer's wiring diagram. Wire door position sensors (magnetic contacts) and alarm outputs if required by the security design.
Before applying power for the first time: Use a multimeter to verify correct voltage at the reader power input terminals and test cable continuity on all data lines. Incorrect voltage or miswired data lines are the leading cause of equipment damage during initial power-up.
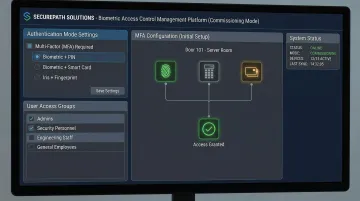
Step 4 — Configure the Management Software and Integrate with Access Control System
Install or access the management platform (on-premise server or cloud dashboard). Change all default admin credentials immediately after first login — CISA classifies shipping products with shared default passwords as a "bad practice" that elevates risk.
This is not theoretical. A 2019 CISA advisory identified hard-coded credentials in the IDenticard PremiSys access control system that allowed admin access via an exposed endpoint.
Assign the reader to a door and controller input in the software. Set reader mode (entry only, exit only, or dual-authentication). Configure access schedules, user role structures, and permission tiers according to your security policy. Enable audit logging to capture all authentication attempts — this is required for compliance in healthcare (HIPAA), financial services (PCI DSS), and critical infrastructure sectors.
Step 5 — Enroll Users
Conduct enrollment in a controlled environment with consistent lighting. For fingerprint or palm readers, ensure the sensor surface and the user's hand are clean and dry. Poor quality biometric samples decrease verification accuracy and increase False Match Rates and False Non-Match Rates.
Capture multiple samples per user to improve template quality — typically 2-3 scans per biometric. Assign each user to the correct access group in the management software. Run a live authentication test for every enrolled user before considering enrollment complete; do not assume successful enrollment equals successful authentication.
For facilities with more than 50 users, schedule dedicated enrollment sessions with trained staff, allowing adequate time per person. Critical infrastructure deployments treat enrollment as a separate commissioning milestone, not an afterthought to hardware installation.
Post-Installation Checks and Validation
Validation must occur before the system enters operational use. Skipping it — especially emergency and backup authentication scenarios — is the single most common cause of delayed operational failures and compliance gaps.
Physical Inspection:
- Verify all mounting points are secure and hardware is properly aligned
- Inspect all cable terminations for secure connections and proper strain relief
- Confirm no exposed wiring or unsealed cable penetrations
Functional Testing:
- Measure door unlock delay from credential presentation to lock release (should be under 2 seconds)
- Test lock release timing across 10 consecutive authentication attempts to confirm consistent performance
- Verify door position sensors correctly report door status (open/closed/held-open) to the management system
Authentication Accuracy Tests Under Realistic Conditions:
- Simulate authorized access attempts by enrolled users at different times of day (varying natural lighting)
- Test different hand positions or facial angles to confirm the system tolerates normal variation
- For palm and fingerprint readers, test with users wearing gloves (should deny access) to confirm liveness detection
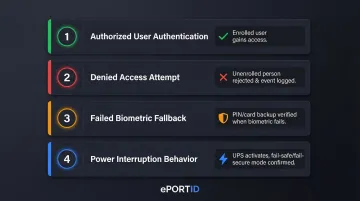
Critical System Behavior Tests:
- Authorized user authentication — Enrolled user successfully gains access
- Denied access attempt — Unenrolled person is correctly rejected and event is logged
- Failed biometric scan fallback — If the system supports PIN or card backup, verify fallback authentication works when biometric fails
- Power interruption behavior — Disconnect power to verify UPS/battery backup activates and the system fails in the correct mode
The last test is particularly critical. Fail-safe locks unlock when power is lost, creating an immediate perimeter breach. Fail-secure locks remain locked when power is lost, maintaining security but potentially creating life-safety issues. Building codes dictate which mode is required:
- Fire doors: NFPA 80 requires electric strikes be fail-secure to maintain positive latching during a fire
- Stairwell re-entry: IBC requires fail-safe locks that unlock upon fire alarm activation or power failure
Test that your installation complies with applicable building codes for your door type and occupancy.
Common Installation Problems and Fixes
The issues below account for the majority of callbacks and rework in biometric access control deployments. Most are preventable with proper pre-installation checks — each follows the same format: what you'll see, why it happens, and how to fix it.
Poor Recognition Accuracy After Installation
Problem: The system consistently rejects enrolled users or produces slow read times (over 3 seconds).
Likely Cause: Reader mounted in a location with direct sunlight, backlighting, excessive ambient heat, or at the wrong height for the biometric modality. Environmental interference degrades biometric capture quality even when the reader hardware is functioning correctly.
Fix:
- Reposition the reader away from direct light sources and confirm no backlighting during peak usage hours
- Adjust mounting height to manufacturer recommendations (typically 4.5-5 feet for palm readers)
- Re-enroll affected users with new template samples captured under controlled conditions
- For readers in harsh outdoor environments, switch to a contactless palm vein reader — it is unaffected by surface contamination, wet conditions, or skin abrasions that typically cause fingerprint reader failures
Communication Failure Between Reader and Access Control Panel
Problem: The reader powers on (LED indicators functional) but does not trigger door release or log authentication events to the management dashboard.
Likely Cause: Wiring protocol mismatch (reader configured for OSDP but panel expects Wiegand), incorrect IP assignment for networked readers, or miswired data lines with reversed polarity.
Fix:
- Verify the reader's output protocol in its admin settings matches the panel's input configuration exactly
- For networked readers, confirm IP assignment is on the correct subnet and ping the device from the management platform
- Re-check all data wiring terminations against the manufacturer's wiring diagram, paying particular attention to RS-485 A/B polarity for OSDP
User Enrollment Failures or Template Quality Issues
Problem: Users cannot complete enrollment, or the system produces high false rejection rates (over 5%) even after enrollment.
Likely Cause: Enrollment conducted in poor conditions — dirty or wet hands, inconsistent lighting, user not aligned correctly with the reader — resulting in low-quality biometric templates stored in the database. NIST research shows poor quality samples significantly decrease verification accuracy.
Fix:
- Delete existing low-quality templates from the database
- Re-enroll affected users under controlled conditions following the manufacturer's enrollment protocol precisely
- Train enrollment staff on proper technique: clean sensor surface, clean dry hands, correct positioning
- For users with physical characteristics that consistently resist enrollment (scarring, skin conditions), configure a secondary credential (PIN or card) as their primary access method rather than forcing biometric enrollment
Pro Tips for Installing a Biometric Access Control System Effectively
Plan for Enrollment Time as a Discrete Project Phase
Do not treat user enrollment as a same-day add-on to hardware installation. For facilities with more than 50 users, schedule dedicated enrollment sessions with trained staff, allowing 2-3 minutes per person for multi-sample capture and access level verification. ePortID's deployments across US Navy installations, Army JTF facilities, and Port Authorities consistently treat enrollment as a separate commissioning milestone with dedicated resources — not an afterthought.
Document Every Installation Decision
Record mounting heights, cable routes, IP assignments, access rule configurations, and firmware versions at time of installation. This documentation cuts diagnosis time during troubleshooting and is often required for compliance audits in regulated sectors (healthcare, financial services, critical infrastructure). Create an installation record that includes:
- Reader serial numbers and firmware versions
- Cable run distances and wire gauges
- Power supply voltages and current draw measurements
- Network configuration (IP addresses, VLAN assignments, port numbers)
- Access rule logic and schedule configurations
Commission High-Security Systems in Multi-Factor Mode Initially
For high-security facilities, do not rely solely on biometrics as a single authentication layer on day one. Commission the system in multi-factor mode (biometric + PIN or biometric + card) during the initial live period to catch enrollment errors and calibration gaps without creating access gaps or lockouts.
Transition to biometric-only authentication once the system has operated reliably over a defined operational period — typically 30-60 days.
Know When to Hire a Specialist
If your deployment covers multiple doors, integrates with existing video surveillance or alarm systems, involves outdoor or harsh-environment readers, or falls under regulated compliance requirements, the risk of DIY installation errors typically exceeds the cost of professional commissioning.
Request proof of experience in comparable environments before engaging any integrator. Specifically ask for:
- References from installations in your industry vertical
- Documentation of certifications from your chosen hardware manufacturer
- Evidence of compliance with relevant regulations (HIPAA, PCI DSS, NFPA, IBC)
- Warranty terms that cover both hardware and installation workmanship
Conclusion
A biometric access control system is only as effective as the installation behind it. Correct specification, proper mounting, accurate wiring, and thorough validation are what deliver the access security, audit trail quality, and operational reliability the system is built for. A rushed or underprepared installation creates vulnerabilities that often don't surface until a security incident occurs — and by then, the consequences extend far beyond the cost of reinstallation.
Four disciplines separate a reliable deployment from a problematic one:
- Plan before you touch hardware — complete compliance review, site survey, and power assessment upfront
- Follow the installation sequence — don't skip steps or reorder tasks to save time
- Validate beyond successful logins — test denial scenarios, backup authentication, and power failure behavior before go-live
- Maintain consistently — monthly sensor cleaning, quarterly software updates, and periodic user re-enrollment protect long-term performance
ePortID's work across seaports, data centers, and critical infrastructure facilities reinforces the same lesson every time: the hardware holds up when the installation process does. Get that right, and the system will too.
Frequently Asked Questions
How much does it cost to install a biometric access control system?
Total installation costs vary widely based on hardware (reader type and number of doors), infrastructure (new vs. existing wiring and locks), software licensing, professional installation labor, and user enrollment time. Single-door installations may cost $2,000-$5,000 including hardware and labor, while enterprise multi-door deployments can exceed $50,000 depending on system complexity and integration requirements.
How does a biometric access control system work?
The system captures a user's biometric data (fingerprint, face, iris, or palm vein pattern), converts it into an encrypted digital template stored in a secure database, and grants access when a live scan matches the stored template within the system's accuracy threshold. Palm vein systems achieve 99.99991% accuracy by analyzing 5 million unique points in the subsurface vascular pattern.
What are the 4 types of access control?
The four models are:
- DAC (Discretionary): owners set permissions
- MAC (Mandatory): system-enforced policies govern access
- RBAC (Role-Based): permissions assigned by job function
- ABAC (Attribute-Based): dynamic attributes determine access rights
Biometric systems typically operate within an RBAC framework, where the biometric scan serves as the credential.
Can a biometric access control system be integrated with an existing security setup?
Most modern biometric readers support open APIs and standard protocols (Wiegand, OSDP), enabling integration with existing panels, video surveillance, and alarm platforms — OSDP became an international standard in 2020, improving interoperability across vendors. Confirm compatibility before purchase, especially with older infrastructure that may only support Wiegand.
What happens if the biometric scanner fails to recognize an authorized user?
Properly installed systems include fallback authentication methods (PIN, RFID card) to prevent lockouts. Persistent false rejections usually indicate a template quality issue that can be resolved by re-enrolling the affected user under controlled conditions with clean sensors and proper hand positioning. Systems should maintain false rejection rates below 1% when properly installed and maintained.
How long does it take to install a biometric access control system?
A single-door installation takes a trained technician 3-5 hours covering hardware mounting, wiring, and basic configuration. Multi-door enterprise deployments typically require 2-5 days across network configuration, software setup, user enrollment, and validation testing.