Introduction
Adding biometrics to a hospital is more demanding than a standard commercial deployment. HIPAA compliance requirements, clinical workflow dependencies, EHR/HIS system integration, and infection control constraints all directly shape device selection and placement before a single unit is mounted.
Who should lead this installation? Not an in-house facilities team working alone. Hospitals need a certified physical security integrator coordinating with the IT/security team and a compliance officer — the combination of protected health information systems, controlled substance zones, and sterile clinical areas demands expertise across physical security, healthcare IT, and regulatory compliance.
When installation is done poorly, the consequences are predictable:
- Mismatched protocols cause EHR authentication failures that only surface after go-live
- Poor device placement creates hygiene risks or bottlenecks when 30+ staff need access during shift changes
- Skipping compliance review leads to HIPAA violations and costly rework when auditors find unencrypted biometric templates or missing audit trails
This guide covers the complete process for planning, installing, integrating, and validating a biometric security system in a hospital environment—from zone assessment through post-installation sign-off.
Key Takeaways
- Hospital biometric installation requires coordination between security integrators, IT, and compliance teams before mounting a single device
- Prerequisites include zone classification, EHR/HIS compatibility assessment, HIPAA review, and modality selection matched to clinical conditions
- Follow this sequence: site prep → device mounting → wiring/network setup → system integration → user enrollment → testing
- Common failures: fingerprint readers in glove zones, poor placement causing bottlenecks, skipped integration testing
- Validate with both authorized and unauthorized test attempts, and configure backup authentication before go-live
Biometric Security Installation Guide for Hospitals
Hospital biometric installations move through four distinct phases: planning and prerequisite verification, physical installation, system integration, and validation. Depending on facility size and the number of access zones being secured, the process typically spans days to weeks.
Every hospital biometric installation requires sign-off from security, IT, compliance, and clinical operations leadership. Shortcuts in any phase typically surface as authentication failures, compliance gaps, or workflow disruption after go-live—when clinical staff are already depending on the system.
Prerequisites and Compliance Considerations
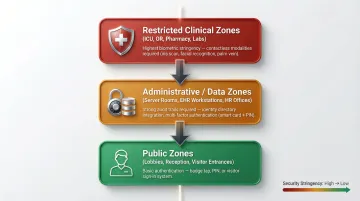
Before any device is specified or ordered, map the hospital's security zones into at least three tiers:
- Public zones (lobbies, reception, visitor entrances)
- Restricted clinical zones (ICU, operating rooms, pharmacy, laboratories)
- Administrative/data zones (server rooms, EHR workstations, HR offices)
Each tier requires a different level of biometric stringency. Public zones may use basic authentication; restricted clinical zones demand the highest accuracy and contactless modalities; administrative zones require strong audit trails and integration with identity directories.
Verify EHR/HIS and access control compatibility before procurement. The selected biometric platform must integrate with the hospital's existing electronic health record system, hospital information system, and physical access control panel via supported protocols—Wiegand, OSDP, SAML 2.0, or OIDC. HITRUST CSF v11.2.0 requires that third-party agreements cover all relevant security requirements, including incident reporting and vulnerability remediation.
HIPAA compliance review must happen before installation begins. Biometric data collected in a healthcare setting is classified as PHI-adjacent. Confirm that the vendor's data handling, encryption standards, template storage method (encrypted mathematical template, not raw biometric image), and audit trail capabilities satisfy HIPAA Security Rule requirements. NIST SP 800-66r2 requires encryption of biometric templates at rest and in transit.
Infection control drives modality selection in clinical areas. Fingerprint scanners requiring skin contact are unsuitable for operating rooms, sterile prep areas, and any zone where staff routinely wear surgical gloves. Contactless modalities—palm vein scanning, facial recognition, or iris scanning—must be specified for these areas. The Institute for Safe Medication Practices (ISMP) recommends biometric identification for automated dispensing cabinets to reduce medication diversion.
Non-negotiables before proceeding:
- EHR integration compatibility confirmed
- HIPAA review completed
- Backup access (emergency override, secondary credential) designed into system architecture
- Modality selection matched to clinical environment (contactless for glove-heavy zones)
Equipment and Materials Required
Core hardware requirements:
- Biometric reader units matched to zone tier and modality (contactless palm vein, facial recognition, iris scanner, or fingerprint for low-risk zones)
- Door access hardware (electric strikes, maglocks, or electrified levers)
- Power supply (12VDC or PoE—Power over Ethernet recommended)
- Network cabling (Cat6 recommended for reliability)
- Access control panel or cloud-based controller
- Enrollment station (standalone or integrated)
- UPS/battery backup for fail-safe operation
Additional hardware to plan for:
- Required: Enrollment stations for staff; secondary credential hardware (RFID card reader or PIN pad) as backup authentication
- Recommended: Patient enrollment kiosks at intake desks; dual-reader configurations at high-traffic entrances
Specialized tools for hospital-grade installation:
- Conduit bending and installation tools for concealed wiring runs
- Weatherproof backboxes for outdoor or semi-outdoor locations
- Anti-ligature mounting hardware for patient-facing areas
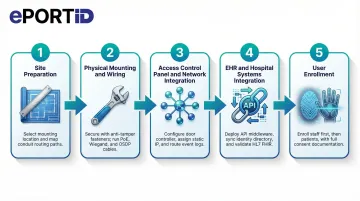
How to Install Biometric Security in a Hospital (Step-by-Step)
Biometric installation in a hospital follows a defined sequence. Skipping steps—particularly integration testing before user enrollment—is the most common cause of post-go-live failures.
Step 1 — Site preparation and mounting location selection:
Select mounting heights appropriate to the modality: eye-level for facial and iris readers, waist-height for palm vein and fingerprint scanners. Avoid direct exposure to overhead clinical lighting or windows, as infrared-based sensors are sensitive to light interference.
In sterile zones, confirm placement avoids high-touch surfaces and allows staff to authenticate without breaking sterile technique. Use the manufacturer's mounting template to mark drill points and route cable through conduit per hospital facilities standards.
Step 2 — Physical mounting and wiring:
Secure each reader unit to its backbox using anti-tamper fasteners. Run power (PoE or 12VDC) and data cables (Wiegand or OSDP to the access control panel; Ethernet for network-connected readers). Label all cable runs clearly.
Test for correct voltage and data continuity before connecting to the panel. For outdoor or semi-outdoor entry points, confirm weatherproofing and grounding.
Step 3 — Access control panel and network integration:
Connect each reader to the door controller input. For panel-based systems, assign each reader to its designated door, configure reader mode (entry only, exit only, or dual-authentication), and link to the appropriate access group.
For cloud-based systems, assign IP addresses, register devices in the management dashboard, and configure door-to-zone mapping. Confirm that event logs are routing correctly to the central system.
Step 4 — EHR and hospital systems integration:
Work with the hospital's IT team to configure API or middleware connections between the biometric platform and the EHR/HIS. Key integration tasks include:
- Syncing the biometric system with the HR identity directory so access permissions reflect role and department
- Confirming that patient biometric enrollment links correctly to records within the EHR
- Validating that HL7 FHIR Digital Identity requirements are met—OpenID Connect with OAuth 2.0 for secure, interoperable identity matching
Test data flow end-to-end before enrolling any users.
Step 5 — User enrollment:
Enroll administrative and clinical staff before any patient enrollment begins. Follow the manufacturer's protocol for each modality—typically 2–3 captures per hand or eye for palm vein and iris readers. For facial recognition, capture in facility lighting at the standard authentication distance.
Assign each enrolled user to their correct access group and zone tier. Obtain and document HIPAA-compliant consent from patients before enrolling them in any biometric identification program. Test each enrolled credential immediately after capture.
Post-Installation Checks and Validation
Run functional testing across all access zone tiers before go-live. Key checks include:
- Simulate authentication attempts with enrolled staff at every zone tier
- Verify ICU-level readers deny staff without appropriate clearance
- Confirm pharmacy readers accept only authorized personnel
- Test lobby throughput at expected peak-volume speeds
- Validate backup credentials (card or PIN) at every access point
For compliance validation, confirm that time-stamped access logs populate correctly in the access control dashboard and, where applicable, the EHR audit trail. Verify that encrypted biometric templates—not raw images—are stored. Check that alerts for failed authentication attempts and offline device status route correctly to the security operations team.
A reader failure during shift change bottlenecks patient care. A reader that silently stops logging creates a HIPAA audit trail gap that may not surface until a breach investigation. Validation catches both problems before they become operational crises.
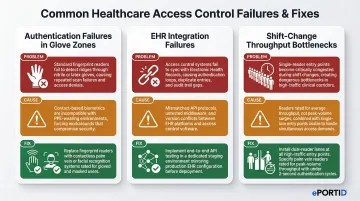
Common Installation Problems and Fixes
Even well-planned hospital biometric installations encounter predictable failure points. Understanding them before go-live reduces rework and clinical disruption.
Authentication Failures in Glove-Heavy or PPE Zones
Problem: Staff wearing surgical or nitrile gloves cannot authenticate via fingerprint readers, causing access failures and workflow delays in sterile areas.
Likely cause: Fingerprint modality was specified for clinical zones without assessing PPE usage frequency—often an oversight during system selection rather than installation.
Fix: Replace or supplement with a contactless modality appropriate for the zone. Palm vein readers work through light glove material; facial recognition systems are fully contactless. Conduct a modality audit of all clinical zones and retrofit where necessary.
EHR/Access Control Integration Failures Post-Installation
Problem: Biometric authentication events do not appear in EHR audit logs, or staff permissions set in the HR directory do not sync to the biometric access control system.
Likely cause: API or middleware configuration was not fully tested end-to-end before go-live, or protocol mismatches (e.g., SAML version mismatch, SCIM provisioning errors) were not resolved during integration.
Fix: Engage the biometric vendor's integration team and the hospital IT team jointly to trace the data flow from authentication event to log entry. Resolve protocol configuration issues in a staging environment before redeploying to production.
Throughput Bottlenecks at High-Traffic Entrances During Shift Changes
Problem: A biometric reader that performs acceptably in low-traffic testing creates queues of 10–20 staff members during peak shift-change periods, disrupting care handover timing.
Likely cause: Authentication speed and reader throughput capacity were not matched to the expected peak volume at that access point during system specification.
Fix: For high-throughput entrances, address this at the hardware selection stage:
- Select readers rated for your expected peak concurrent authentication volume
- Compare authentication speeds against shift-change staff counts before specifying hardware
- Consider dual-reader or lane configurations at the highest-traffic entry points
Palm vein readers authenticate in under 2 seconds, making them well-suited for high-volume clinical entrances where speed and hygiene both matter.
Pro Tips for Installing Hospital Biometrics Effectively
Three practices consistently separate smooth hospital biometric rollouts from costly ones.
Phase enrollment sequentially, not all at once. Enroll security and IT staff first so they can troubleshoot in a live environment, then department heads, then broader clinical staff. Stagger patient enrollment through intake over the weeks following go-live.
This approach reduces errors and surfaces real-world performance data before the full user population depends on the system.
Choose vendors with demonstrated critical infrastructure experience. Hospitals share security characteristics with ports, military installations, and power stations: high-consequence access zones, 24/7 operations, no tolerance for failure. When evaluating vendors, ask specifically about continuous-operation deployments in those environments.
ePortID, for example, built its platform through 20 years of work with the US Navy, Army JTF, Marine Corps, and port authorities — the kind of track record that translates directly to healthcare's unforgiving uptime requirements.
Document everything and build a formal sign-off process. Before declaring any zone live, capture:
- Mounting locations (with photos)
- Wiring diagrams and firmware version logs
- Written sign-off from IT, security, compliance, and clinical operations leadership
This documentation is essential for HIPAA audit readiness, future upgrades, and troubleshooting authentication incidents. The Joint Commission standard EC.02.01.01 mandates that hospitals track and monitor vendor access, purpose, and compliance — your installation records are the evidence trail.
Conclusion
Installation quality in a hospital biometric deployment directly determines patient safety outcomes, data security posture, and regulatory compliance. A system that's poorly installed carries clinical and legal consequences — not just technical ones.
The planning work done upfront — zone mapping, modality selection, EHR integration testing, compliance review — pays back many times over in reduced post-go-live rework and faster incident response. The hospitals that treat installation as a strategic process, rather than a technical afterthought, are the ones that avoid costly disruptions down the line.
Key decisions that shape long-term success:
- Zone classification and access tier mapping before hardware selection
- Modality choice matched to clinical environment (contactless where infection control matters)
- EHR and access control integration validated before go-live
- HIPAA audit trail configuration verified at every access point
- Staff training completed before the system goes live, not after
ePortID's contactless palm vein scanning systems are designed specifically for environments where accuracy, hygiene, and compliance aren't optional. With deployments across critical infrastructure and healthcare facilities, the team brings the kind of real-world installation experience that keeps projects on schedule and systems performing as intended from day one.
Frequently Asked Questions
How can biometrics be used in hospitals and healthcare?
Hospitals use biometrics for patient identity verification at intake, secure staff access to clinical zones (ICU, pharmacy, labs), EHR authentication, controlled substance dispensing, and fraud prevention. This covers both physical access and digital authentication, ensuring only authorized personnel reach restricted areas and sensitive patient data.
What are the most secure and accurate biometric systems and vendors for hospital security?
Palm vein scanning leads in accuracy and hygiene for healthcare settings, particularly in zones requiring PPE or sterile technique — it works through gloves, requires no contact, and checks for liveness during every scan. When evaluating vendors, prioritize those with verifiable critical infrastructure and healthcare deployments, not just commercial office experience, since hospital environments demand 24/7 uptime.
Do biometric systems in hospitals need to be HIPAA compliant?
Biometric data isn't directly named PHI, but because it controls access to PHI systems, it falls under the HIPAA Security Rule. Compliant implementations require encrypted template storage, role-based access controls, and audit trails logging all authentication events and failed attempts.
Can biometric readers work when healthcare staff are wearing gloves or masks?
Fingerprint readers fail with gloved hands — contactless modalities are the correct choice for clinical zones. Palm vein scanning is the most reliable option in PPE-heavy environments, reading through gloves without contact. Facial recognition with liveness detection can also accommodate masked staff in many current systems.
How long does it take to install biometric access control in a hospital?
Timeline depends on facility size, access zone count, and integration complexity. A single-building hospital with 10–20 access points may take 1–3 weeks; multi-building systems with full EHR integration typically run 4–8 weeks or more. A 600-bed hospital case study showed that 1,500+ access points can be completed in 4 months with a phased rollout.
What happens if a staff member fails to authenticate during an emergency?
All hospital biometric systems must include a backup authentication method (RFID card, PIN, or security override) and a defined emergency access procedure. Fail-safe or fail-secure lock behavior should be configured based on the criticality of each access point before the system goes live. NFPA 101 dictates strict fail-safe egress requirements to ensure legal egress during emergencies.